Thursday, July 31, 2008

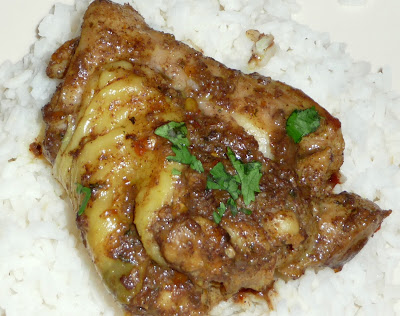
Sri Lanka Chicken Curry

So I guess I was feeling in a worldly mood when I picked out this Indian dish. I wanted to do something different, and turns out I'm glad I did. I'm confessing that the only Indian dish I've ever had is Chicken Tikka, which is pretty much the tamest dish you can get and is basically the starter meal if you're exploring Indian food. So here I am trying to broaden my horizons.

The recipe makes a rather large amount of chicken, so I halved it and it was just enough for Denny and I, with lunch leftovers for Denny for the next day. It was a pretty easy meal and the ingredients are straightforward. The only thing I had trouble finding was the coconut milk, but I found it in the ethnic aisle of my supermarket after I asked an employee for help... not sure why I didn't think to check there to begin with!

Everything cooked up perfectly in this dish and the flavors were great. I was a little nervous how it would all come together, but it was delicious and I'll definitely make it again. Try it, you'll like it!


Sri Lanka Chicken Curry
(from Bon Appétit magazine)

2/3 cup chopped onion
5 garlic cloves, peeled
2 Tbsp. chopped peeled fresh ginger
1 Tbsp. curry powder
1 Tbsp. ground cinnamon
3/4 tsp. dried crushed red pepper
1/2 cup chopped fresh cilantro, divided
12 chicken thighs with skin and bones
2 Tbsp. vegetable oil
2 cups canned unsweetened coconut milk
1 cup low-salt chicken broth
1/2 teaspoon turmeric
Freshly cooked rice

1. Blend first 6 ingredients and 1/4 cup cilantro in processor to form paste, stopping frequently to scrape down sides of bowl. Rub paste over chicken.

2. Heat oil in heavy large skillet over medium-high heat. Add chicken and brown on all sides, about 6 minutes. Add coconut milk, broth, and turmeric. Reduce heat, cover, and simmer until chicken is cooked through, turning once, about 30 minutes. Transfer chicken to plate. Boil liquid in skillet until reduced to sauce consistency, about 4 minutes. Season to taste with salt. Return chicken to skillet; heat through. Sprinkle with remaining 1/4 cup cilantro. Serve over rice.

Tuesday, July 29, 2008

Tuesdays With Dorie - Summer Fruit Galette


I joined Tuesdays With Dorie! For those who don't know, it's an online baking group that bakes a new creation and posts it each week. There are over 200 members and it's growing quickly. It seems like so much fun and I think it's really going to challenge me and take me out of my comfort zone in the kitchen. There are tons of talented people who make up this group, so I would be happy if my baking is even half as good as everyone else's.

This week's selection was made by Michelle of Michelle In Colorado Springs, and you can find the recipe on her blog. With this being my very first week, I felt the pressure to be successful! My intentions were to use pears, but can you believe that 2 grocery stores did not have pears? So I instead settled on apples, which I knew would go over well in my house. I had apple butter in the fridge, so I used that as my base. I was a little worried how it would taste, but it turned out great.

I have to admit that I can't even remember the last time that I've rolled out dough. And I really need to upgrade my rolling pin, which is just about as old as I am. I really got a workout rolling out that dough... embarassingly enough, I asked my husband for a tad bit of help after my arms started to feel the burn. It just reminded me how out of shape I am.

I used just a little of the custard and didn't have any leakage, as I've read that some of the other bakers had. And I sprinkled a little cinnamon on the top before baking. Everything came out pretty perfect. My husband had a bite and said, "I'm a fan." So I guess I was successful for week 1. Maybe I CAN do this... bring on week number 2!


Monday, July 28, 2008

Broccoli with Zesty Lime Dip


There's always the usual dips with plain old broccoli, but this one actually marinates the broccoli - what a great idea! I threw this together so quickly and easily and brought it to a picnic we went to this weekend. There was one woman there who was going on and on about how great this was. She literally sat herself in front of this and ate away. I guess I'd call it a hit!

I used Zesty Italian dressing for the marinade. I actually think I over-blanched the broccoli a bit, because I think the goal was for it to still be crispy, but mine was definitely more cooked. But it didn't matter, it was still yummy. I zested the entire lime, and it gave a nice color to the dip. This one is really foolproof, and so good.


Broccoli with Zesty Lime Dip
(Adapted from For Goodness Taste cookbook by The Junior League of Rochester)

2 bunches broccoli
8 oz. Italian dressing
1 cup mayonnaise
1 cup sour cream
1 fresh lime
2 to 3 Tbsp. horseradish
2 Tbsp. Dijon mustard
1 tsp. salt

1. Cut broccoli into florets. Blanch in boiling water for 3 minutes to brighten color; cool immediately with cold water.

2. In zip-top plastic bag, marinate broccoli in Italian dressing. Refrigerate 2 to 3 hours or overnight.

3. Remove zest from lime and squeeze juice. Combine with remaining dip ingredients and refrigerate until ready to serve.

Makes about 10 servings.

Saturday, July 26, 2008

Chicken and Tomato Phyllo Pie

Last weekend we went up and visited the in-laws. Within just a few minutes of walking in the door, my husband's stepmother alerted me of a recipe that I just had to try (it's nice having a fellow cook in the family!). She pulled out a copy of Relish magazine and showed me the most gorgeous looking pizza made with phyllo dough. I told her that I had never cooked with phyllo dough, but this thing looked so awesome I knew I had to take on the challenge.

I made a few tad changes to the recipe, like adding the chicken. Unfortunately for me, if you ask my husband, a meal is not really a meal without some meat. So I find myself always adding in some meat even if a recipe is perfect the way it is. But I ended up really liking the addition of the chicken, and it made the pizza a little more hearty.

I was rather intimidated by the phyllo dough, but it really was a cinch. You can use any size phyllo dough that you want, just increase or decrease the cooking time depending on what you use. My grocery store had 9" by 14" sheets of dough, so we ended up with a little pizza that was perfect for the two of us. The finished results were so gorgeous and delicious.


Chicken and Tomato Phyllo Pie
(adapted from Relish magazine)

1/4 cup butter, melted
2 garlic cloves, crushed
8 phyllo sheets
1/2 cup shredded cooked chicken breast
1 cup shredded mozzarella
3 medium red and/or orange tomatoes, thinly sliced
1/4 cup sliced red onion
4 oz. crumbled feta cheese
1/3 cup chopped fresh basil

1. Lightly grease a large baking sheet. Preheat oven to 375 degrees F.

2. Combine butter and garlic. Place 1 phyllo sheet on pan. Brush with butter mixture. Repeat with remaining phyllo sheets and butter mixture.

3. Sprinkle phyllo with mozzarella to within 2.5 inches of the edges, top with sliced tomatoes, chicken, and onion. Sprinkle with feta cheese and basil. Roll phyllo edges to form rim. Bake approximately 20 minutes, until phyllo is crisp and cheese is melted.

Serves 4-6

Wednesday, July 23, 2008

Chocolate Espresso Cake with Mocha Glaze


We had company over recently so I had the opportunity to bake, yay! This recipe was calling out to me and I had to try it. It calls for just a little espresso in both the cake and the glaze, so it has just a hint of the espresso taste and it's delicious. The cake is very moist and rich, so it warrants a tall glass of milk to go alongside of it. Sinfully delicious!


Chocolate Espresso Cake with Mocha Glaze
(from Bon Appétit magazine)

Cake:
3/4 cup plus 2 Tbsp. (1 and 3/4 sticks) unsalted butter
10 ounces bittersweet (not unsweetened) or semisweet chocolate, chopped
4 tsp. instant espresso powder or instant coffee powder
4 large eggs
1 and 1/4 cups sugar
1 Tbsp. vanilla extract
3/4 cup all purpose flour

Glaze:
2/3 cup whipping cream
2 tsp. instant espresso powder or instant coffee powder
8 ounces bittersweet (not unsweetened) or semisweet chocolate, chopped
1/2 tsp. vanilla extract

For cake:
1. Preheat oven to 350 degrees. Butter and flour 9-inch-diameter springform pan. Stir butter, chocolate, and espresso powder in heavy medium saucepan over low heat until melted and smooth. Transfer to large bowl and cool to room temperature. Add eggs, sugar, and vanilla; whisk until well blended. Add flour and whisk just until blended.

2. Transfer batter to prepared pan. Bake cake until tester inserted into center comes out with moist (not wet) batter attached, about 45 minutes. Cool completely in pan.

For Glaze:
1. Mix cream and espresso powder in medium saucepan. Bring to simmer over medium heat, whisking to blend. Remove from heat. Add chocolate and vanilla; whisk until melted and smooth. Let cool until thickened but still pourable, stirring often, about 20 minutes.

2. Using small knife, cut around pan sides to loosen cake. Remove pan sides. Place cake on its pan bottom on rack set over baking sheet. Pour glaze evenly over top of cake, allowing glaze to run down sides; smooth glaze over cake with metal spatula. Let cake stand until glaze sets, about 2 hours. Transfer cake to plate. Cover with cake dome and refrigerate overnight. (Can be prepared 2 days ahead; keep refrigerated.) Let stand at room temperature 2 hours before serving.

Thursday, July 17, 2008

Tacos with Chorizo and Potato Filling


Have I ever mentioned how much I love Mexican food? These tacos are SO good! The recipe uses just a few ingredients and seems so simple, yet the flavors are so great and it really just works.

If you're not familiar with chorizo, it's a type of sausage. There is both Mexican and Spanish chorizo, and be sure to use the Mexican chorizo for this. The recipe calls for using a waxy potato, which would be a fingerling potato or a red potato. Waxy potatoes aren't as starchy and don't fall apart as easily when cooked. Be sure to cook up the potato a little bit beforehand. I opted to fry up my potato chunks in a skillet and they came out nice and golden brown. Warm up your tortillas in a 325 degree oven for about 5 minutes or wrap them in a damp cloth and microwave for about 30 seconds.

The chipotle chile is listed as optional in the recipe and I decided to add it in. It gives the tacos a little more of a spicy kick. I like a little spice, but not the mouth on fire type of spicy. These turned out just perfect - not too hot. So I'd recommend throwing in the chile, I don't think you'll be sorry!

I added a little shredded cheese and sour cream to ours and it was great. Feel free to add your own personal favorite taco toppings - lettuce, tomato, salsa, cilantro, etc. My husband asked if I could make this more often, so it's obviously a keeper. Yum!


Tacos with Chorizo and Potato Filling
(From My Mexican Kitchen by Diana Kennedy)

About 1 Tbsp. vegetable oil
1 Mexican chorizo (about 3 ounces), casings removed
About 1 rounded cup diced cooked (al dente) waxy potatoes
1 chipotle chile in adobo, chopped (optional)
Salt
4 warm tortillas or taco shells

1. Place the vegetable oil in a small skillet. Crumble the chorizo, add to the pan, and cook over low heat for a few minutes until the fat has been rendered. Add the potatoes and chile (if using) and continue to cook over medium heat, scraping the bottom of the skillet from time to time to prevent sticking, until the potato is well seasoned, about 8 minutes. Season with salt to taste. Set aside to cool a little before using.

Wednesday, July 16, 2008

Red and Yellow Bell Pepper Relish

We had company over recently and made a fabulous beef tenderloin. I had this recipe for a beef relish and decided I'd make it. It is absolutely delicious! I made this a day ahead of time to let the flavors meld, and it also made my dinner preparations on the night we had company so much easier.

This relish uses simple ingredients. I actually omitted the olives because I'm not a big fan, and it tasted great regardless. You can heat this up or serve it at room temperature. The little bit of mustard flavor is fantastic! I highly recommend trying this.


Red and Yellow Bell Pepper Relish
(from Bon Appétit magazine)

2 Tbsp. (1/4 stick) butter
2 Tbsp. olive oil
1 large onion, thinly sliced
1 red bell pepper, coarsely chopped
1 yellow bell pepper, coarsely chopped
1/3 cup coarsely chopped pitted Kalamata olives
1 Tbsp. Dijon mustard
1 garlic clove, chopped

1. Melt butter with oil in a heavy large skillet over medium-high heat. Add onion and sauté until golden, about 5 minutes. Add all peppers and sauté until just tender, about 3 minutes. Add olives, mustard, and garlic; stir 1 minute. Remove from heat. Season to taste with salt and pepper.

2. Transfer relish to bowl. Cool, then cover and refrigerate overnight. (Relish can be made 2 days ahead. Keep refrigerated.) Bring to room temperature before serving.

Monday, July 14, 2008

Fresh Corn Cakes

We are big fans of sweet corn in my house and we take every opportunity to make it while it's in season. This recipe is a great use for corn. I love the idea of cooking with fresh corn, so when I saw this recipe I knew I had to try it.

These were really easy to make and the recipe makes a TON! We only had a few, and the rest are in the freezer for next time. The blend of corn and mozzarella tastes so good in these. Like little cheesy cornbread cakes! I made these as a side dish, but I almost contemplate reheating them and putting a little jelly on them for breakfast one morning. You can definitely get creative with these.


Fresh Corn Cakes
(from Southern Living magazine)

2 and 1/2 cups fresh corn kernels (about 5 ears)
3 large eggs
3/4 cup milk
3 Tbsp. butter, melted
3/4 cup all-purpose flour
3/4 cup yellow or white cornmeal
1 (8-oz.) package fresh mozzarella cheese, grated
2 Tbsp. chopped fresh chives
1 tsp. salt
1 tsp. freshly ground black pepper

1. Pulse first 4 ingredients in a food processor 3 to 4 times or just until corn is coarsely chopped.

2. Stir together flour and next 5 ingredients in a large bowl; stir in corn mixture just until dry ingredients are moistened.

3. Spoon 1/8 cup batter for each cake onto a hot, lightly greased griddle or large non-stick skillet to form 2-inch cakes (do not spread or flatten cakes). Cook cakes 3 to 4 minutes or until tops are covered with bubbles and edges look cooked. Turn and cook other sides 2 to 3 minutes.

Makes about 3 dozen.

Sunday, July 13, 2008

Peanut-Crusted Chicken with Pineapple Salsa


I'm always looking for great low-calorie recipes, especially with fresh ingredients. This recipe jumped out at me from the pages of Cooking Light magazine. Not only is it healthy with only about 200 calories per serving, but it's quick and easy to prepare for a weeknight meal.

The pineapple salsa is just 3 great ingredients - pineapple, onion and cilantro. You can pick up a container of fresh pineapple chunks at the supermarket to save time instead of chopping up a whole pineapple. And the pineapple is so refreshing with the chicken - very tasty!

The recipe calls for chicken cutlets, and I actually used chicken breasts, since we had a ton in our freezer. I sliced each breast in half and then pounded them out to make them thinner. The breading for the chicken was super easy to make, and the peanuts give it a really nice flavor. This was great!


Peanut-Crusted Chicken with Pineapple Salsa

1 cup chopped fresh pineapple
2 Tbsp. chopped fresh cilantro
1 Tbsp. finely chopped red onion
1/3 cup unsalted, dry-roasted peanuts
1 (1-ounce) slice white bread
1/2 tsp. salt
1/8 tsp. black pepper
4 (4-ounce) chicken cutlets
1 and 1/2 tsp. canola oil
Cooking spray
Cilantro sprigs (optional)

1. Combine first 3 ingredients in a small bowl, tossing well.

2. Combine peanuts and bread slice in a food processor; process until finely chopped. Sprinkle salt and pepper evenly over chicken. Dredge chicken in the breadcrumb mixture.

3. Heat oil in a large nonstick skillet over medium-high heat. Coat pan with cooking spray. Add chicken to pan; cook 2 minutes on each side or until done. Serve chicken with pineapple mixture. Garnish with cilantro sprigs, if desired.

Makes 4 servings.

Friday, July 11, 2008

Blueberry Crisp

Our blueberry picking this past weekend yielded a few pounds of blueberries. The first thing I knew I needed to make was a blueberry crisp. It was my first attempt at one. I've made apple crisp and loved it, but never blueberry. I decided to use a recipe that I picked up from the farm where we got the berries. The farm's owner, Faith Herndon, handed out some great recipes. I figured she must know a thing or two about making a good blueberry crisp. So despite seeing a ton of blueberry crisp recipes out there, I settled on hers.

This is a nice little crisp baked in a pie pan. It was really delicious. I have to admit that my husband and I finished it off in just two days. The blueberries were super sweet, and we loved it. I can't wait to make my next blueberry creation - muffins or a blueberry pound cake? Hhmmm...


Blueberry Crisp

Topping:
1/2 cup firmly packed dark brown sugar
6 Tbsp. all-purpose flour
6 Tbsp. rolled oats
1/4 tsp. ground cinnamon
pinch of salt
4 Tbsp. (1/2 stick) unsalted butter, chilled

Filling:
1 pint rinsed, dried blueberries
1/2 cup sugar
1 Tbsp. all-purpose flour
1 Tbsp. orange juice concentrate

1. Preheat oven to 350 degrees. Butter 9" pie plate. Make topping. Combine dry ingredients and mix well. Cut in butter with knife and mix with your fingers until texture of coarse crumbs.

2. Prepare filling. Combine all, mix well, pour into pie plate. Spread crumb topping evenly over filling.

3. Bake 20 minutes. Serve slightly warm.

Makes 6 servings.

Wednesday, July 9, 2008

Sausage and Pepper Baked Ziti


Since my husband has a little bit of Italian in him, I feel the need to create not just mediocre Italian dishes for him, but really great ones. He loves a hearty lasagna or baked ziti, and it's so satisfying to see him get excited when I make one of these dishes for him.

I found this baked ziti recipe a while back and have made it a handful of times. Each time it seems better than the last. The thick chunks of sausage make it so filling and satisfying. It's overflowing with onions and peppers and garlic which make it taste really fresh.

This is a pretty easy dish to prepare. The boiling of the pasta and the chopping of the veggies are what make it rather time consuming, but it's really foolproof. Throw in some ground beef or some of your other favorite veggies to give it your own spin. But don't add too much - the 13" by 9" dish that I bake this in is always nearly overflowing when I pour it all in. We had this last night and barely made a dent in it because it's so huge. This means leftovers for lunch for the next few days... I can envision my hubby sitting at his desk at work chowing down and smiling...


Sausage and Pepper Baked Ziti
(from Good Housekeeping magazine)

1 and 1/2 pounds sweet and/or hot Italian sausage links, cut crosswise into 1-inch chunks
4 garlic cloves, thinly sliced
2 large green, yellow, and/or red peppers, cut into 1/4-inch slices
1 onion, cut in half, then cut crosswise into 1/4-inch slices
28 oz. can crushed or whole tomatoes in puree
15 oz. can tomato puree
1 tsp. salt
1 pound ziti or penne pasta
1 package (8 oz.) part-skim mozzarella cheese, cut into 1/2-inch cubes
1/2 cup grated Pecorino Romano cheese

1. Prepare sauce: In deep nonstick skillet, cook sausage over medium-high heat 5 minutes or until browned on all sides, stirring occasionally.

2. Reduce heat to medium. Discard all but 2 tablespoons sausage fat. To sausage in skillet, add garlic, peppers, and onion, and cook, covered, 10 minutes or until vegetables are tender, stirring occasionally. Stir in tomatoes with their puree, tomato puree, and salt; heat to boiling over medium heat, breaking up tomatoes if necessary with side of spoon. Reduce heat to low; cover and simmer 10 minutes.

3. Meanwhile, preheat oven to 400 degrees. Heat large covered saucepot of salted water to boiling over high heat. Add pasta; cook 2 minutes less than cooking time recommended on label.

4. Drain pasta. Return to pot; stir in sauce to coat. Add mozzarella; toss to combine. Transfer pasta mixture to ungreased 13" by 9" glass or ceramic baking dish and spread evenly; sprinkle with Romano.

5. Bake, uncovered, 20 to 25 minutes or until top browns and sauce is bubbling. Let stand 10 minutes for easier serving.

Makes about 10 servings.

Tuesday, July 8, 2008

Summer Ice Cream Series - Mandarins and Ice Cream Cake


Each year on my birthday I request an ice cream cake. It is my absolute favorite. But I have never had a non-traditional ice cream cake (as in the kind without the chocolate, vanilla, and crunchies). So I've had this recipe in my big recipe binder for a long time and have never had an occasion to try it. Well, I still didn't have an occasion but in honor of my summer ice cream series, I decided to just make it for my hubby and I.

This ice cream cake rocks! It makes me think of something that would be sold as dessert in a restaurant. It's that refreshing and delicious. It came out perfect and I love it! And as a bonus, it also photographed nicely due to the bright layers and orange topping.

The recipe takes quite a while to finish, with having to freeze each layer after it's completed. And it was also a little pricey between the biscotti, mascarpone and the orange sorbet. So I'll probably save this recipe and make it again on a really special occasion. It'll be worth it.


Mandarins and Ice Cream Cake
(from Better Homes and Gardens magazine)

1/3 cup butter, melted
1 and 1/2 cups crushed purchased spiced biscotti (about 6 oz.)
1 pint vanilla ice cream
1 8-oz. carton mascarpone cheese
1 pint orange sorbet, softened
1/2 cup orange marmalade
11-oz. can mandarin orange sections, drained

1. Line a 2-quart baking dish with foil, extending foil over edges of dish. In a bowl stir together butter and crushed biscotti. Spread in prepared baking dish. Press firmly to form an even crust. Freeze.

2. In a chilled bowl stir ice cream to soften. In another bowl stir mascarpone cheese to soften. Slowly add the softened ice cream to the mascarpone, stirring well (mixture may be slightly lumpy). Spoon into crust-lined dish and spread evenly. Freeze 1 hour or until firm. Spoon sorbet on top of the vanilla ice cream and spread evenly with the back of a large spoon. Cover; freeze 4 hours or until firm.

3. Let frozen mixture stand at room temperature for 10 minutes. Lift from pan using foil. In a small saucepan cook and stir marmalade just until heated through. Stir in orange sections.

4. To serve, cut ice cream into 9 squares. Top each square with some of the citrus mixture.

Makes 9 servings.

Monday, July 7, 2008

Smashed Potatoes Olé

This recipe called out to me because my husband is the type of person who loves to mix everything on his plate together, much to my horror. So the corn, carrots, garlic and jalapeno peppers all inside mashed potatoes reminded me of him. I just knew I had to make it for him, and we're both glad that I did.

Smashed Potatoes Olé is a great variation to traditional mashed potatoes, but with the addition of vegetables and jalapeno peppers to give it a kick. Sour cream and cheese are added to make it creamier and richer. And it all really works great together. Salt and pepper can be added to your liking, but I didn't think it even needed a pinch of them, it was just that perfect. They also warmed up great the next day as leftovers. This will definitely be a regular in our house.


Smashed Potatoes Olé
(from Good Housekeeping magazine)

2 to 3 ears of corn or 1 cup of frozen whole kernel corn
3 medium yellow potatoes (about 1 pound), peeled and cut up
3 medium round red potatoes (about 1 pound), peeled and cut up
3 medium carrots, peeled and sliced
2 medium fresh jalapeno chile peppers, halved, seeded, and sliced
4 cloves garlic, minced
1/4 cup butter
1/4 cup sour cream
1 cup shredded sharp cheddar cheese
salt and ground black pepper

1. Cut corn kernels from cobs (you should have about 1 cup). In a large saucepan cook corn, potatoes, carrots, jalapeno peppers, and garlic, covered, in enough boiling water to cover for 15 to 20 minutes or until vegetables are tender. Drain off water.

2. Add butter to vegetables. Coarsely mash vegetables with potato masher. Stir in sour cream and 3/4 cup of the cheese. Season to taste with salt and pepper. Top with remaining cheese.

Makes 6 servings.

Saturday, July 5, 2008

Mediterranean Chicken Couscous

If you've never made couscous, now is your time to try! Couscous is made from something called semolina, which is the same ingredient that is found in pasta. It can be purchased right at your local grocery store, usually in the rice aisle. It's a great alternative to pasta or rice as a side dish. Or, like this recipe, you can make it as a main dish. And it's surprisingly easy to prepare. Try it, you'll like it!

This recipe is a favorite in our house because not only does it taste great, but it is unbelievably quick and easy. Expect it to take you only about 20 minutes to prepare. It's also healthy, with only about 200 calories per serving. The great thing is you can serve this cold on a hot summer day if you desire. I prefer warm because I love the cheese to be soft and the chicken to be warm. Use two large chicken breasts in this, or substitute a rotisserie chicken. Fresh basil, which the recipe calls for, works best. Or, you can substitute 4 teaspoons of dried basil.


Mediterranean Chicken Couscous
(adapted from Cooking Light)

1 1/4 cups low-sodium fat-free chicken broth
1 (5.6 oz.) package toasted pine nut couscous mix
3 cups chopped cooked chicken (about 2 large chicken breasts)
1/4 cup chopped fresh basil
1 (4 oz.) package crumbled feta cheese
1 pint grape tomatoes, halved
1 1/2 Tbsp. fresh lemon juice
1 tsp. grated lemon rind
1/4 teaspoon pepper

1. Heat broth and seasoning packet from couscous in the microwave on high for 3 to 5 minutes or until broth begins to boil. Place couscous in a large bowl, and stir in broth mixture. Cover and let stand 5 minutes.

2. Fluff couscous with a fork; stir in chicken and next 6 ingredients. Serve warm or cold. Garnish with fresh basil leaves, if desired.

Wednesday, July 2, 2008

Stuffed Red Peppers

I am a huge fan of Paula Deen and all of her cookbooks. I just got her second cookbook for my birthday - The Lady and Sons, Too! I have been marking nearly every other page as a recipe I want to try. She has the absolute best southern recipes. I gain weight just by reading her recipes, so I can't imagine what making and eating all of these are going to do to my hips!

The stuffed red peppers came out so great. Not only were they delicious, they look gorgeous too! Very nice presentation if you're entertaining. The recipe was very easy to make... I just hated having to wait so long for them while they baked. Next time I may make a little extra of the inside stuffing to have on the side.


Stuffed Red Peppers

4 large red bell peppers, preferably with stems
3/4 pound ground chuck
1/2 pound ground pork
1 medium onion, chopped
2 cloves garlic, minced
2 teaspoons beef bouillon granules
1/2 teaspoon salt
1/2 teaspoon pepper
1 cup cooked rice
1/2 cup jarred Old El Paso Cheese and Salsa (or similar brand)
1/2 cup sour cream
1 cup diced tomatoes
1/2 cup chopped green onion tops
1 Tbsp. soy sauce
1 cup hot water

1. Cut the peppers in half lengthwise, leaving the stems intact and halving them also. Remove the seeds and ribs.

2. Saute the beef and pork, the onion, garlic, 1 tsp. of the bouillon granules, the salt and the pepper, scrambling well, until the onion is transparent. Drain off the fat. Add the rice, cheese, sour cream, tomatoes, green onion tops, and soy sauce. Mix well. Stuff this mixture into the peppers.

3. Mix the hot water and the remaining 1 tsp. bouillon granules. Pour this into a shallow casserole dish large enough to hold all the peppers. Place the stuffed peppers into the dish. (The water in the dish allows the peppers to steam while retaining some of their crispness.) Cover the casserole with foil and bake at 350 degrees for 30 to 35 minutes. Remove the foil and spoon a little juice over the peppers; bake for an additional 10 to 15 minutes.

Serves 6-8